1. Giới thiệu
Trên mạng có khá nhiều bài hướng dẫn cài đặt MySQL trên CentOS 7 rồi. Tuy nhiên tôi thấy đa phần đều sử dụng yum để cài đặt
Mà trên thực tế, mấy khi Database Server được kết nối trực tiếp với Internet đâu. Cho nên tôi viết bài này, chia sẻ thêm cách cài đặt MySQL bằng các gói RPM để các bạn tham khảo thêm.
Trong bài này, tôi sẽ hướng dẫn các bạn cài đặt hệ quản trì Cơ sở dữ liệu MySQL 8.0 trên hệ điều hành Linux 7 nhé.
Môi trường bài lab như sau:
- Máy chủ: VMWare
- CPU: 6 cores
- RAM 16GB
- Free disk: 100G
- Hệ điều hành: CentOS Linux 7.8
- Database Version: MySQL Community Server 8.0.27
2. Download bộ cài MySQL Community Server 8
Đầu tiên bạn vào link sau để download MySQL:
[wp-svg-icons icon=”download-3″ wrap=”i”] Link download MySQL
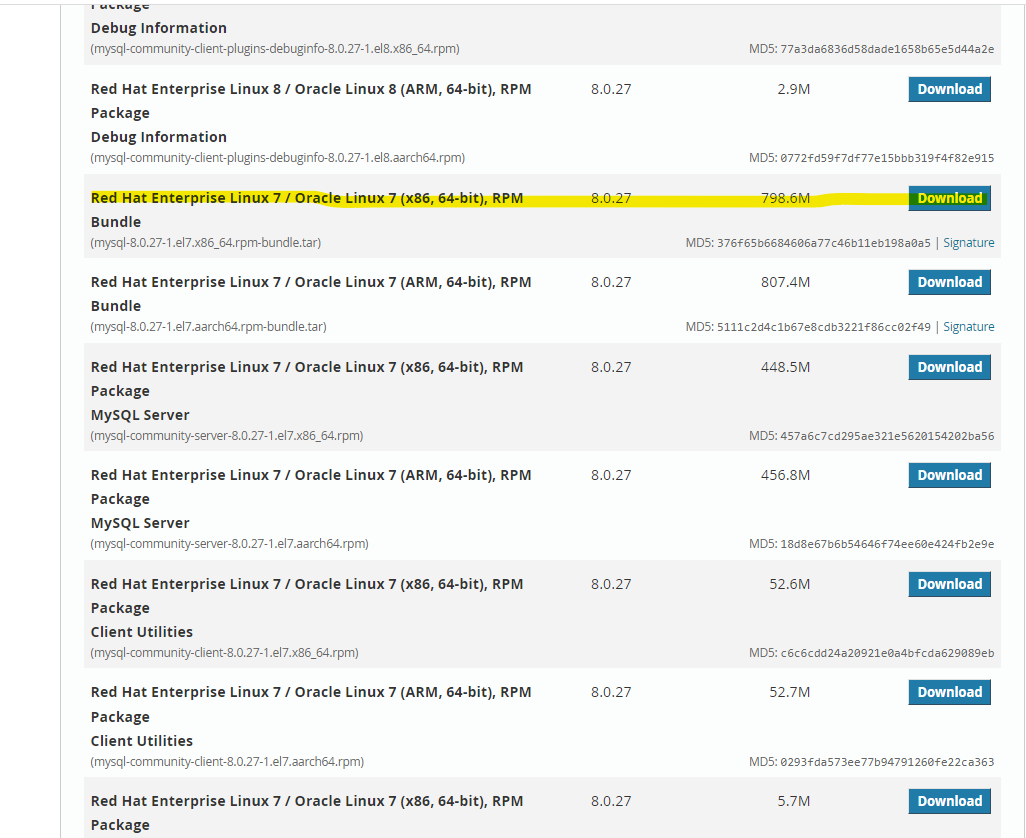
Tiếp theo bạn click vào link như ảnh dưới đây. (Có rất nhiều gói MySQL trong này, nhưng tôi chọn gói này vì nó bao gồm tất cả các gói cần thiết để bạn cài đặt MySQL)

Chúng ta sẽ cần tài khoản Oracle để download được. Việc đăng ký tài khoản là hoàn toàn miễn phí. Nếu bạn đã có tài khoản, hãy đăng nhập để tiếp tục download.
3. Bắt đầu cài đặt
Bây giờ, bạn cần upload file cài đặt MySQL lên server. Sau khi upload, tôi sẽ có 1 file như sau:

1. Giải nén
mkdir mysql-setup

mv mysql-8.0.27-1.el7.x86_64.rpm-bundle.tar mysql-setup

cd mysql-setup

tar -xvf mysql-8.0.27-1.el7.x86_64.rpm-bundle.tar
2. Cài đặt
rpm -Uvh mysql-community-common-8.0.27-1.el7.x86_64.rpm

rpm -Uvh mysql-community-client-plugins-8.0.27-1.el7.x86_64.rpm

rpm -Uvh mysql-community-libs-*

rpm -Uvh mysql-community-client-8.0.27-1.el7.x86_64.rpm

rpm -Uvh mysql-community-server-8.0.27-1.el7.x86_64.rpm
3. Khởi động dịch vụ mysql
systemctl enable mysqld

systemctl start mysqld
Kiểm tra lại bằng lệnh sau:
systemctl status mysqld
Nếu kết quả như sau là được:

3. Tăng cường bảo mật MySQL
Khi MySQL được khởi động lần đầu tiên, một mật khẩu ngẫu nhiên sẽ được tạo ra cho root, là user quản trị của MySQL. Bạn có thể tìm thấy mật khẩu bằng cách chạy lệnh sau:
cat /var/log/mysqld.log | grep password
Kết quả như sau:

Như các bạn thấy, password của root tạm thời đang là: qbLk1<qZLyZE
Đây là password sinh ngẫu nhiên, nên chắc chắn khi bạn tự cài đặt, password này sẽ khác đấy.
Bước cuối cùng, bạn hãy tăng cường khả năng bảo mật của MySQL bằng cách chạy lệnh sau:
mysql_secure_installation
Nó sẽ yêu cầu bạn đổi lại password cho root, xóa các user, database không cần thiết, và revoke 1 số quyền có khả năng khiến database của bạn kém bảo mật hơn.
Chú ý: Ở bước này, password mới cần có từ 8-12 ký tự, bao gồm số, ký tự đặc biệt, in hoa, in thường.
[root@oracle12c ~]# mysql_secure_installation

Securing the MySQL server deployment.

Enter password for user root: <nhập password tạm thời>

The existing password for the user account root has expired. Please set a new password.

New password: <nhập password mới>

Re-enter new password:<nhập password mới>
The 'validate_password' component is installed on the server.
The subsequent steps will run with the existing configuration
of the component.
Using existing password for root.

Estimated strength of the password: 100
Change the password for root ? ((Press y|Y for Yes, any other key for No) : y

New password: <nhập password mới>

Re-enter new password:<nhập password mới>

Estimated strength of the password: 100
Do you wish to continue with the password provided?(Press y|Y for Yes, any other key for No) : y
By default, a MySQL installation has an anonymous user,
allowing anyone to log into MySQL without having to have
a user account created for them. This is intended only for
testing, and to make the installation go a bit smoother.
You should remove them before moving into a production
environment.

Remove anonymous users? (Press y|Y for Yes, any other key for No) : y
Success.


Normally, root should only be allowed to connect from
'localhost'. This ensures that someone cannot guess at
the root password from the network.

Disallow root login remotely? (Press y|Y for Yes, any other key for No) : y
Success.

By default, MySQL comes with a database named 'test' that
anyone can access. This is also intended only for testing,
and should be removed before moving into a production
environment.


Remove test database and access to it? (Press y|Y for Yes, any other key for No) : y
- Dropping test database...
Success.

- Removing privileges on test database...
Success.

Reloading the privilege tables will ensure that all changes
made so far will take effect immediately.

Reload privilege tables now? (Press y|Y for Yes, any other key for No) : y
Success.

All done!
4. Kết nối vào MySQL:
mysql -u root -p
Welcome to the MySQL monitor. Commands end with ; or \g.
Your MySQL connection id is 17
Server version: 8.0.27 MySQL Community Server - GPL

Copyright (c) 2000, 2021, Oracle and/or its affiliates.

Oracle is a registered trademark of Oracle Corporation and/or its
affiliates. Other names may be trademarks of their respective
owners.

Type 'help;' or '\h' for help. Type '\c' to clear the current input statement.

mysql>
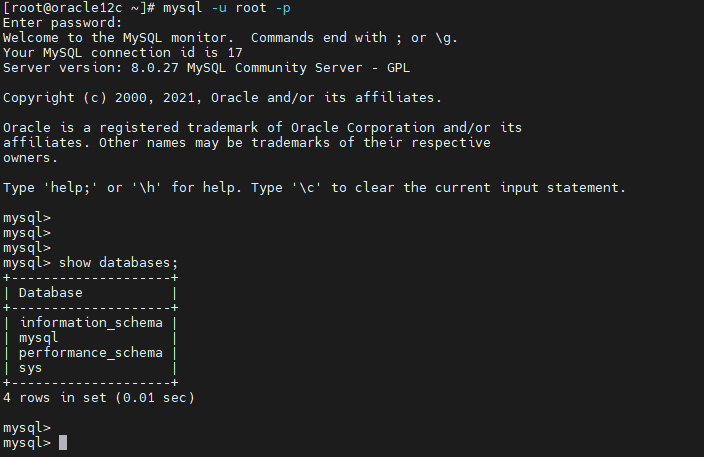
Kiểm tra các database hiện có
mysql> show databases

Kết quả như thế này là thành công rồi đó. Chúc các bạn thành công.
Nguồn: https://dangxuanduy.com/
Hiện tại, tôi có tổ chức đều đặn các khóa học về quản trị Oracle Database, tôi sẽ để thông tin ở đây, để bạn nào quan tâm về lịch học cũng như chương trình học có thể theo dõi nhé.
KHOÁ DÀNH CHO NGƯỜI MỚI
KHÓA HỌC: QUẢN TRỊ ORACLE DATABASE THẬT LÀ ĐƠN GIẢN (ADMIN 1)
CÁC KHOÁ NÂNG CAO:
KHÓA HỌC ORACLE NÂNG CAO: QUẢN TRỊ KIẾN TRÚC MULTITENANT 12c
KHÓA HỌC ORACLE NÂNG CAO: QUẢN TRỊ HỆ THỐNG DATA GUARD
CÁC KHOÁ COMBO:
COMBO 1: ADMIN 1 + MULTITENANT 12c
COMBO 3: ADMIN 1 + MULTITENANT 12c + DATA GUARD
LỊCH HỌC:
Mời bạn xem tại đây: LỊCH HỌC CÁC LỚP ORACLE
ĐĂNG KÝ:
https://forms.gle/MtCAoRQFenP886y79
Hãy tham gia group “Kho tài liệu kiến thức database” để cùng học hỏi và chia sẻ nhé.
