1. Giới thiệu
Cài đặt PostgreSQL trên CentOS 7 là vô cùng dễ dàng. Chỉ cần bạn đã có kiến thức nền tảng về hệ điều hành Linux là đã có thể cài đặt được 1 hệ thống PostgreSQL được rồi.
2. Download PostgreSQL
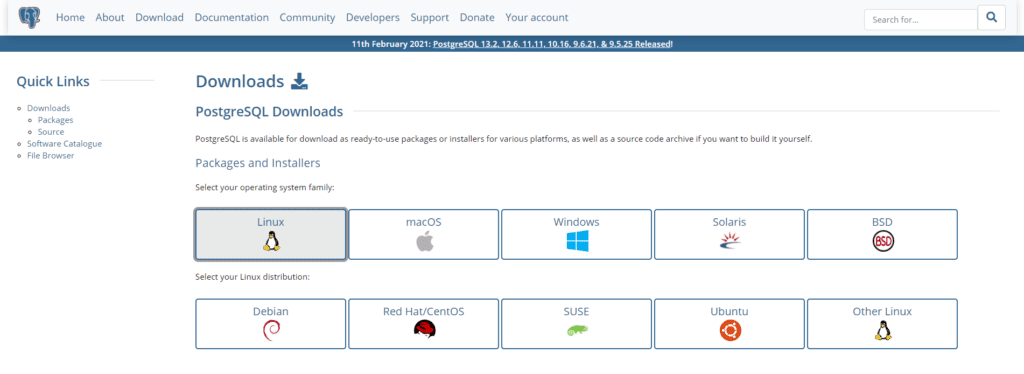
Đầu tiên, bạn vào link sau để đến trang download của PostgreSQL:
https://www.postgresql.org/download/
Bạn click vào Linux, tiếp theo click vào RedHat / CentOS.

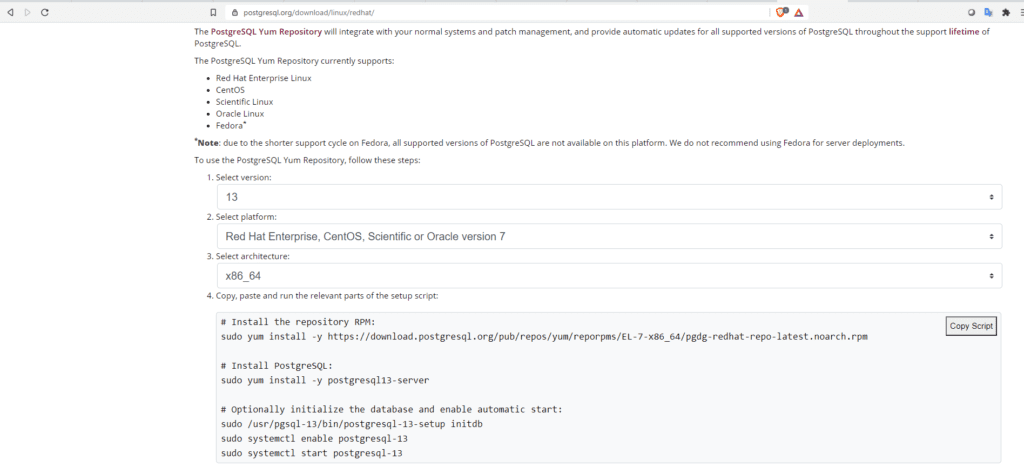
Bạn sẽ thấy trang web hướng dẫn cách cài đặt PostgreSQL cho từng phiên bản và hệ điều hành luôn. Bạn chỉ cần lựa chọn phiên bản PostgreSQL và phiên bản hệ điều hành bạn muốn. Ở đây tôi lựa chọn phiên bản PostgreSQL là 13, phiên bản hệ điều hành là RedHat Enterprise, CentOS, Scientific or Oracle version 7

Lần lượt thực hiện các lệnh sau:
Download gói phần mềm PostgreSQL bằng yum (Có thể chạy bằng root hoặc user có quyền sudo nhé)
sudo yum install -y https://download.postgresql.org/pub/repos/yum/reporpms/EL-7-x86_64/pgdg-redhat-repo-latest.noarch.rpm
3. Cài đặt PostgreSQL
sudo yum install -y postgresql13-server
Kết quả như sau:
Loaded plugins: langpacks, product-id, search-disabled-repos, subscription-manager
..
..
Resolving Dependencies
--> Running transaction check
---> Package postgresql13-server.x86_64 0:13.1-1PGDG.rhel7 will be installed
--> Processing Dependency: postgresql13-libs(x86-64) = 13.1-1PGDG.rhel7 for package: postgresql13-server-13.1-1PGDG.rhel7.x86_64
--> Processing Dependency: postgresql13(x86-64) = 13.1-1PGDG.rhel7 for package: postgresql13-server-13.1-1PGDG.rhel7.x86_64
--> Processing Dependency: libpq.so.5()(64bit) for package: postgresql13-server-13.1-1PGDG.rhel7.x86_64
--> Running transaction check
---> Package postgresql13.x86_64 0:13.1-1PGDG.rhel7 will be installed
---> Package postgresql13-libs.x86_64 0:13.1-1PGDG.rhel7 will be installed
--> Finished Dependency Resolution

Dependencies Resolved

===============================================================================================================
 Package                          Arch                Version                        Repository           Size
===============================================================================================================
Installing:
 postgresql13-server              x86_64              13.1-1PGDG.rhel7               pgdg13              5.4 M
Installing for dependencies:
 postgresql13                     x86_64              13.1-1PGDG.rhel7               pgdg13              1.4 M
 postgresql13-libs                x86_64              13.1-1PGDG.rhel7               pgdg13              379 k

Transaction Summary
===============================================================================================================
Install  1 Package (+2 Dependent packages)

Total download size: 7.1 M
Installed size: 30 M
Downloading packages:
(1/3): postgresql13-libs-13.1-1PGDG.rhel7.x86_64.rpm                                    | 379 kB  00:00:27
(2/3): postgresql13-13.1-1PGDG.rhel7.x86_64.rpm                                         | 1.4 MB  00:00:27
(3/3): postgresql13-server-13.1-1PGDG.rhel7.x86_64.rpm                                  | 5.4 MB  00:00:03
---------------------------------------------------------------------------------------------------------------
Total                                                                          237 kB/s | 7.1 MB  00:00:30
Running transaction check
Running transaction test
Transaction test succeeded
Running transaction
  Installing : postgresql13-libs-13.1-1PGDG.rhel7.x86_64                                                   1/3
  Installing : postgresql13-13.1-1PGDG.rhel7.x86_64                                                        2/3
  Installing : postgresql13-server-13.1-1PGDG.rhel7.x86_64                                                 3/3
  Verifying  : postgresql13-libs-13.1-1PGDG.rhel7.x86_64                                                   1/3
  Verifying  : postgresql13-13.1-1PGDG.rhel7.x86_64                                                        2/3
  Verifying  : postgresql13-server-13.1-1PGDG.rhel7.x86_64                                                 3/3

Installed:
  postgresql13-server.x86_64 0:13.1-1PGDG.rhel7

Dependency Installed:
  postgresql13.x86_64 0:13.1-1PGDG.rhel7              postgresql13-libs.x86_64 0:13.1-1PGDG.rhel7

Complete!
4. Khởi tạo database
Sau khi đã cài đặt xong các gói phần mềm cho PostgreSQL, chúng ta cần khởi tạo database bằng câu lệnh như sau:
sudo /usr/pgsql-13/bin/postgresql-13-setup initdb
Initializing database ... OK
Câu lệnh này sẽ tạo ra 1 database cluster với đường dẫn dữ liệu đặt theo biến môi trường PGDATA (mặc định ở bản 13c thì đó là /var/lib/pgsql/13/data). Nếu bạn muốn lưu dữ liệu tại đường dẫn khác bạn có thể chạy lệnh sau trước khi thực hiện câu lệnh “sudo /usr/pgsql-13/bin/postgresql-13-setup initdb” bên trên
export PGDATA=/postgres/pgdata
Và cuối cùng cấu hình để PostgreSQL tự khởi động mỗi khi hệ điều hành khởi động
sudo systemctl enable postgresql-13
sudo systemctl start postgresql-13
5. Kiểm tra kết quả
Sau khi thực hiện xong các bước cài đặt trên, PostgreSQL sẽ tạo ra cho chúng ta 1 user là postgres để quản trị database
Từ user root chúng ta gõ lệnh sau để chuyển qua user posgres (các bạn có thể đổi password cho postgres bằng lệnh passwd)
su - postgres
Thực hiện tiếp lệnh sau:
psql

Kết quả:

psql (13.2)
Type "help" for help.
postgres=#
Bạn gõ tiếp lệnh
postgres=# \l
                                        List of databases
      Name      |   Owner   | Encoding |   Collate   |    Ctype    |      Access privileges
----------------+-----------+----------+-------------+-------------+------------------------------
 postgres       | postgres  | UTF8     | en_US.UTF-8 | en_US.UTF-8 | =Tc/postgres                +
                |           |          |             |             | postgres=CTc/postgres       +
                |           |          |             |             | tms_replication=CTc/postgres
 template0      | postgres  | UTF8     | en_US.UTF-8 | en_US.UTF-8 | =c/postgres                 +
                |           |          |             |             | postgres=CTc/postgres
 template1      | postgres  | UTF8     | en_US.UTF-8 | en_US.UTF-8 | =c/postgres                 +
                |           |          |             |             | postgres=CTc/postgres
(3 rows)

postgres=#
Đây là danh sách các database mặc định trên PostgreSQL. Nếu kết quả hiển thị như thế này tức là bạn đã hoàn thành cài đặt PostgreSQL rồi đó. Xin chúc mừng!!
Một số bài viết khác về PostgreSQL:
Nguồn: https://dangxuanduy.com/
Hiện tại, tôi có tổ chức đều đặn các khóa học về quản trị Oracle Database, tôi sẽ để thông tin ở đây, để bạn nào quan tâm về lịch học cũng như chương trình học có thể theo dõi nhé.
KHOÁ DÀNH CHO NGƯỜI MỚI
KHÓA HỌC: QUẢN TRỊ ORACLE DATABASE THẬT LÀ ĐƠN GIẢN (ADMIN 1)
CÁC KHOÁ NÂNG CAO:
KHÓA HỌC ORACLE NÂNG CAO: QUẢN TRỊ KIẾN TRÚC MULTITENANT 12c
KHÓA HỌC ORACLE NÂNG CAO: QUẢN TRỊ HỆ THỐNG DATA GUARD
CÁC KHOÁ COMBO:
COMBO 1: ADMIN 1 + MULTITENANT 12c
COMBO 3: ADMIN 1 + MULTITENANT 12c + DATA GUARD
LỊCH HỌC:
Mời bạn xem tại đây: LỊCH HỌC CÁC LỚP ORACLE
ĐĂNG KÝ:
https://forms.gle/MtCAoRQFenP886y79
Hãy tham gia group “Kho tài liệu kiến thức database” để cùng học hỏi và chia sẻ nhé.
